Creating your own sewing patterns from existing garments is an invaluable skill for any sewing enthusiast. This process allows you to replicate your favorite clothes, ensuring a perfect fit tailored just for you. In this detailed guide, we will walk you through the steps required to make your own patterns from existing clothing. From gathering your materials to finalizing your new pattern, we’ve got you covered.
- Understanding the Benefits of Making Your Own Patterns
- Step 1: Gather Your Materials
- Step 2: Prepare Your Existing Garment
- Step 3: Choose Which Parts to Copy
- Step 4: Trace the Garment
- Step 5: Connect the Dots and Add Seam Allowance
- Step 6: Label Your Pattern Pieces
- Step 7: Cut Out Your Pattern Pieces
- Step 8: Test Your Pattern
- Step 9: Make Adjustments
Understanding the Benefits of Making Your Own Patterns
Before diving into the how-tos, it’s essential to understand why making a pattern from an existing garment is beneficial. Not only does it save time by eliminating the need to search for a similar pattern in stores, but it also allows for customization according to your body shape and preferences. This technique, often referred to as “rubbing off,” empowers you to create unique pieces that reflect your style.
Step 1: Gather Your Materials
To successfully create a sewing pattern, you’ll need a few essential materials:
- Existing Garment: Choose a piece of clothing that fits you well and is relatively simple in design, such as a basic shirt, skirt, or dress 5 .
- Tracing Paper or Pattern Paper: This is where you’ll trace the pattern pieces. Ensure it is large enough to accommodate the garment.
- Ruler: A clear ruler with marked increments will aid in accuracy when measuring and drawing lines.
- Pencil or Tracing Wheel: For transferring the garment’s design onto your tracing paper.
- Scissors: To cut out your pattern pieces.
- Pins or Weights: These will hold the garment in place while you trace the pattern.
Step 2: Prepare Your Existing Garment
Select a garment in good condition that you love and where all seams and edges lie flat. Iron it if necessary to remove any wrinkles that might distort your pattern 10 . Lay the garment on a flat surface, ensuring it is smoothed out completely before tracing.
Step 3: Choose Which Parts to Copy
Decide which pieces of the garment you want to replicate, such as the front, back, sleeves, etc. It’s best to start with simple pieces if you are new to pattern drafting. Avoid garments with excessive embellishments or closures like zippers and buttons at this stage 9 .
Step 4: Trace the Garment
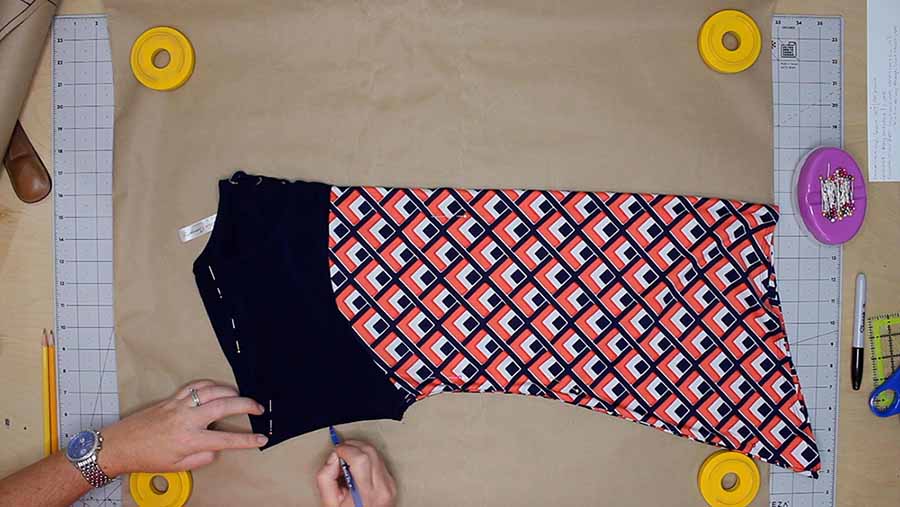
Begin by pinning or weighing down one piece of the garment onto your tracing paper. Using your pencil or tracing wheel, carefully trace around the edges of the garment. Make sure to include essential markings such as:
- Darts: Mark their placement clearly.
- Seams and Notches: Include these details to ensure proper alignment when sewing.
- Grainlines: Indicate the fabric’s grain direction on each pattern piece.
Press down lightly but firmly so that the tracing is clear, creating a visual guide for the pattern you’re about to create 3 6 .
Step 5: Connect the Dots and Add Seam Allowance
After tracing, you will notice the pattern of holes created by the pins or your pencil. Connect these dots to form smooth lines and shapes that represent your garment. Once you have outlined the pieces, it’s time to add seam allowance. Typically, this is between 1 to 1.5 cm for seams and 2 to 2.5 cm for hems. To do this, measure from the traced line and mark it out evenly around the edges using your ruler 10 .
Step 6: Label Your Pattern Pieces
Clearly label each piece of your pattern. Indicate what each piece is (e.g., front bodice, back sleeve), any markings necessary for alignment, and whether it needs to be cut on a fold. These details will be very helpful during the sewing process 4 7 .
Step 7: Cut Out Your Pattern Pieces
Once you have added seam allowances and labeled everything, use your scissors to carefully cut out each pattern piece along the marked lines. Ensure your cutting is smooth and accurate to maintain the integrity of the patterns 9 .
Step 8: Test Your Pattern
Before diving into your fabric, it’s wise to test your new pattern using muslin or another inexpensive fabric. Make a quick mock-up of your garment to check for fit issues or any necessary adjustments. This “toile” helps ensure that the pattern works effectively before you commit to your selected fabric 10 .
Step 9: Make Adjustments
After testing your pattern, examine the fit and any areas requiring alterations. Use this opportunity to make adjustments as needed. If there are specific areas in the existing garment that don’t
Not only does creating your own patterns foster a deeper connection to your sewing projects, but it also promotes sustainability by enabling you to upcycle and breathe new life into your favorite pieces. As you refine your pattern-making skills, you’ll find endless opportunities to expand your wardrobe without relying on store-bought options.
So grab your fabric scissors and tracing paper and get started on your journey to creating unique clothing that fits and reflects your style perfectly! Whether you’re replicating a beloved dress or designing something entirely new, the skills you’ve learned will serve you well in all your future sewing endeavors.


